

Tired of blurry selfies and asking strangers for help? This post reveals the game-changing strategies I use to capture breathtaking self-portraits while traveling alone, making every destination look like a professional photoshoot. Get ready to transform your travel memories and your Instagram feed!
The wind whipped around me on the Cliffs of Moher, a dramatic symphony of nature playing out against the vast Atlantic. I’d hauled my tripod, camera, and a backpack full of snacks across half of Ireland for this moment. Tourists milled about, snapping quick phone shots, but I had a different mission. I carefully set up my gear, composed the shot, and then, with a click of a tiny remote in my hand, I stepped into the frame, arms outstretched, a tiny figure dwarfed by the epic landscape. Later, looking at the shot, I knew it wasn't just a photo; it was a memory, perfectly captured, and entirely mine.
For years, my solo travel photos were… well, they were fine. Mostly selfies, occasionally a well-meaning but often wonky photo taken by a stranger. I’d come home from incredible adventures with vivid memories but a distinct lack of me in those epic landscapes. I felt like I was missing out on truly documenting my journey, showcasing the joy and wonder I experienced. That's when I decided to crack the code of solo travel photography – not just selfies, but genuine, awe-inspiring self-portraits that tell a story. And guess what? It’s not as hard, or as expensive, as you think.
This isn't about being an influencer; it's about empowering your travel experience, creating lasting memories, and maybe, just maybe, inspiring others to embark on their own solo adventures. Forget the awkward asks and the blurry results. Here’s how I take amazing photos of myself while traveling alone, secrets nobody really talks about.
### 1. Your Solo Travel Photography Toolkit: Beyond the Selfie Stick
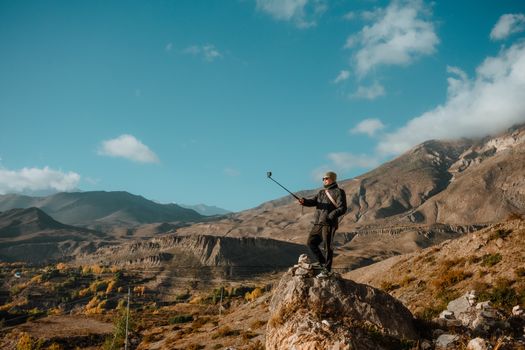
Let’s be honest, the selfie stick has its place, but it screams "tourist" and limits your creativity. To truly elevate your solo shots, you need a few key pieces of gear. Think of them as your silent, ever-ready travel companions.
* The Trusty Tripod: This is your absolute MVP. Forget flimsy, tiny ones. Invest in something sturdy yet portable. I swear by my Manfrotto Pixi Evo 2 (around $50-60) for tabletop/low-angle shots and a Peak Design Travel Tripod (pricier at $350-600, but worth every penny for serious travelers) for full height and stability. The Peak Design one folds down incredibly small, making it a dream for backpacking. For budget travelers, even a basic aluminum tripod from Amazon for $20-30 will be a game-changer. Just ensure it can hold your camera (even if it's just your phone with a phone mount adapter).
* The Remote Shutter: This little gadget is pure magic. For phone cameras, a simple Bluetooth remote (under $10) lets you trigger your shutter from up to 30 feet away. For mirrorless or DSLR cameras, check if your camera has a built-in Wi-Fi app (like Sony's Imaging Edge Mobile or Canon Camera Connect) that acts as a remote, or invest in a dedicated remote shutter release (wired or wireless). This means no more running back and forth, or relying on clumsy timers.
* Your Camera of Choice: While I often travel with my Sony A6400 mirrorless camera and a versatile prime lens (like a 35mm f/1.8), don't underestimate your smartphone! Modern phones like the iPhone 15 Pro or Samsung Galaxy S24 Ultra have incredible cameras. The key is knowing how to use them effectively (more on that later). If you're starting, master your phone camera first.
* Power Banks and Extra Batteries: Nothing kills a photo session faster than dead batteries. Always carry at least one high-capacity power bank for your phone and ensure your camera batteries are fully charged, with spares if possible. I learned this the hard way trying to capture the sunrise over Angkor Wat only to have my battery die after three shots!
Budget Tip:
Start with your smartphone, a basic phone tripod mount, and a Bluetooth remote. You can get all three for under $40-50 and instantly upgrade your photo game.
### 2. The Art of Solo Composition: Telling Your Story
Having the right gear is only half the battle. The other half is knowing how to use it to create compelling images. When you’re your own model and photographer, composition becomes even more critical.
Embrace the Environment: Your goal isn't just a headshot; it's to place yourself within* the scene. Use the rule of thirds (imagine a tic-tac-toe grid over your shot, placing yourself or key elements at the intersections) to create balance. Frame yourself small in a grand landscape – like standing on the edge of the Grand Canyon or strolling through a rice paddy in Vietnam – to emphasize the scale and wonder of the place.
* Leading Lines are Your Friends: Roads, paths, rivers, fences, even the edge of a building can draw the viewer's eye towards you and into the photo. I once used the ancient stone steps of a Mayan ruin in Mexico to lead the eye directly to me, sitting thoughtfully at the top.
* Find Natural Frames: Look for arches, doorways, windows, or overhanging tree branches that can naturally frame you in the shot, adding depth and interest. A classic example is standing under the archways of the Colosseum in Rome.
Posing Naturally (It’s an Art!): This is where many solo travelers struggle. The trick is to move*. Don't just stand there stiffly. Walk away from the camera, look out into the distance, tie your shoe, adjust your hat, or even pretend to read a map. Take a burst of photos (many cameras and phones have a burst mode) and pick the most natural-looking one. I often set my camera to take 10-15 shots in quick succession while I'm doing a simple action, like walking or turning. It feels awkward at first, but the results are worth it.
* The 'Look-Away' Gaze: Instead of staring directly at the camera, look slightly off-camera, towards the view, or down. This creates a sense of candidness and allows the viewer to imagine themselves in your shoes, experiencing the same moment. It also helps avoid the "staged" feel.
Personal Anecdote:
In Kyoto, Japan, I wanted a shot walking through the iconic Fushimi Inari-taisha shrine's vermillion torii gates. It’s always packed! Instead of trying to get a perfect clear shot (impossible), I found a slightly less crowded section, set up my tripod, and used the leading lines of the gates to frame me walking away, a small figure disappearing into the endless path. It perfectly captured the feeling of discovery and immersion.
### 3. Mastering Light and Timing: Your Photo Power Duo
Light can make or break a photo. When you’re your own photographer, you have the ultimate control over when and where you shoot.
* Golden Hour is God-Tier: This is the hour after sunrise and the hour before sunset. The light is soft, warm, and magical. It casts long, flattering shadows and makes everything glow. This is when you want to be out shooting your most important self-portraits. I've woken up before dawn countless times, from the bustling streets of Marrakech's medina to the tranquil beaches of Bali, just to catch this light. The reward is always worth the early start.
* Blue Hour’s Underrated Charm: The short period just before sunrise or after sunset, when the sky turns a deep, rich blue. It’s fantastic for cityscapes, neon signs, and dramatic silhouettes. Think Eiffel Tower at dusk or Times Square lit up.
Avoid Midday Harshness: The sun directly overhead creates harsh shadows, washes out colors, and makes you squint. If you must* shoot at midday, seek out open shade (like under a tree or an awning) to get more even lighting, or use the harsh light creatively for high-contrast, dramatic silhouettes.
* Scout Your Locations: Before you even set up your camera, walk around and observe the light. Where is it coming from? How does it hit the subject? Are there any interesting shadows? What's the background like? Knowing your spot and the direction of the sun will save you tons of time and frustration. I often 'scout' locations the day before, taking mental notes or quick phone snaps to plan my morning or evening shoot.
* Patience is a Virtue (and a Necessity): Popular spots will have people. Sometimes you just have to wait for a gap in the crowds. I once spent 45 minutes patiently waiting for a clear shot of a bustling market street in Hoi An, Vietnam, setting up my tripod and simply observing, until a brief lull allowed me to get my perfect shot. Don't rush it.
Cultural Insight:
When shooting in public places, especially culturally sensitive ones like temples or local markets, be mindful of your surroundings. Avoid blocking pathways, be respectful of locals (ask for permission if you're directly including them, or just be discreet), and don't make a scene with your elaborate setup. A discreet setup with a small tripod and remote is usually fine.
### 4. Befriending Technology: Editing Magic in Your Pocket
Taking the photo is just the first step. Post-processing is where your images truly come alive and get that professional, share-worthy polish. And you don't need a fancy laptop or expensive software anymore.
* Lightroom Mobile (Free & Paid): This is my go-to. The free version offers powerful editing tools, from exposure and contrast adjustments to color grading. If you subscribe to Adobe Creative Cloud (which I do for desktop editing), you get even more features like selective adjustments and cloud syncing. I use it to adjust whites, blacks, shadows, and highlights, and fine-tune colors.
* Snapseed (Free): Google's Snapseed is incredibly intuitive and powerful, especially for quick fixes. Its "Selective" tool lets you adjust brightness, contrast, and saturation in specific areas of your photo, which is fantastic for brightening your face or darkening a distracting background element.
* VSCO (Free & Paid): For beautiful, film-like filters and presets, VSCO is a fantastic choice. It offers a more curated aesthetic and can give your photos a consistent look and feel across your feed.
* Presets for Speed: Once you find an editing style you love, create or download presets. These are pre-saved editing adjustments that you can apply to multiple photos with one tap, giving your feed a cohesive, professional look. Many travel bloggers sell their custom presets, or you can find free ones online.
* Basic Edits to Master:
* Crop and Straighten: Essential for good composition.
* Exposure: Brighten or darken the image.
* Contrast: Make highlights brighter and shadows darker.
* Highlights/Shadows: Recover detail in blown-out bright areas or crushed dark areas.
* White Balance: Adjust the color temperature to make whites truly white (or add warmth/coolness).
* Saturation/Vibrance: Boost colors (Vibrance is more subtle and usually preferred).
* Sharpening: Add a touch of crispness. Be careful not to overdo it!
Personal Anecdote:
I remember taking a stunning photo of myself against a vibrant sunset in Santorini, Greece. The colors were incredible, but my face was a bit underexposed. A few quick adjustments in Lightroom Mobile – boosting the shadows, adding a touch of clarity, and a slight warmth to the white balance – transformed it from a good photo into a truly breathtaking one that garnered hundreds of likes and comments on Instagram. The power of editing is truly transformative.
### 5. The Unsung Heroes: Planning, Patience, and Permission
While gear and technique are vital, the underlying success of my solo travel photography often comes down to these three often-overlooked elements.
* Strategic Planning & Research: Before I even arrive at a destination, I'm usually doing a quick Google Images or Instagram search for "best photo spots in [City/Country]" or "sunrise [Location name]". I look at how others have framed shots, what time of day they seem to have been taken, and what angles work best. I also check for any local regulations or fees for photography. This saves immense time and ensures I'm not scrambling on the spot.
* Patience is Your Superpower: This cannot be stressed enough. Solo photography requires patience – for the perfect light, for the crowds to thin, for that one boat to pass by, or for you to get your pose just right. Don't rush. Take a deep breath, enjoy the moment, and wait for your window. If a spot is truly swarming, consider coming back at a different time (very early morning or late evening) or finding a slightly different, less obvious angle.
* Permission & Cultural Sensitivity: This is paramount, especially when traveling alone.
* Know the Rules: Some places (certain temples, museums, indigenous communities) may have photography restrictions or require a permit. Always respect these rules.
* Be Discreet: Setting up a large tripod and camera can draw attention. Try to be as unobtrusive as possible, especially in sacred or residential areas. If you're using a drone, understand local drone laws and privacy concerns.
* Ask Before You Shoot (Especially People): If you're trying to get a shot that involves a local person, even as background, make eye contact and politely ask "Photo?" (or the local equivalent). A smile and a nod usually work wonders. If they decline, respect it immediately. I often gesture to my camera and then to them, with a questioning look. Most people are happy to oblige, especially if you offer to show them the picture.
* Safety First: When setting up your gear, always be aware of your surroundings. Don't leave your camera unattended in a vulnerable spot, especially in crowded areas. Secure your tripod if it's windy. Trust your gut – if a location feels unsafe or isolated, err on the side of caution. I often use a camera strap that attaches to my body, even when on a tripod, for an extra layer of security.
Getting Around:
Often, the best photo spots are accessible by foot, public transport, or a short taxi ride. For remote locations, consider renting a scooter (only if you're an experienced rider and have insurance!) or hiring a local driver for a few hours. This allows you to bring your gear comfortably and reach those early morning/late evening spots safely. Always negotiate prices upfront with taxis or drivers.
### 6. The 'Human Element' Hack: When to Ask (and How)
While this post is about empowering you to take your own photos, there are rare occasions when asking for help makes sense. And there's a right way to do it.
Strategic Moments: If you want a shot of yourself interacting* with something (e.g., holding a local craft, participating in a cooking class, or a dynamic action shot), or if you simply can't get the angle with your tripod, it's okay to ask.
* Pick Your Person Wisely: Look for other travelers with good cameras (they often understand composition) or someone who looks friendly and isn't rushing. Avoid asking people who look stressed, busy, or are clearly struggling with their own kids.
Give Clear Instructions: Don't just hand them your phone/camera and hope for the best. Set it up exactly how you want the shot, frame it, and then politely say, "Could you please hold it here and press this button?" Show them where to press. If using your camera, explain which* button to press and ask them to ensure you're in focus. I often take a quick test shot on my camera, show it to them, and say "Like this!" It works wonders.
* Offer to Return the Favor: Always, always offer to take their photo in return. It’s polite and often leads to them being more invested in getting a good shot for you.
Personal Anecdote:
In Chefchaouen, Morocco, the blue city, I wanted a shot of myself looking up at the vibrant blue walls, something my tripod couldn't quite capture due to the narrow streets. I spotted another solo traveler with a mirrorless camera, and after a friendly chat, we exchanged photo favors. We both ended up with some of our favorite shots from the trip, and a new travel friend!
### Conclusion: Your Story, Your Lens, Your Adventure
Solo travel is an incredible journey of self-discovery, and having the skills to capture that journey beautifully is truly empowering. No more missed moments, no more relying on others, and certainly no more awkward selfies trying to cram an entire landscape into your phone's frame.
By investing in a little gear, understanding the basics of composition and light, embracing the magic of editing, and practicing patience and respect, you'll transform your travel photos from "meh" to "magnificent." These aren't just pictures; they're tangible memories, visual diaries of your bravery, curiosity, and the incredible world you've explored.
So, pack your bags, grab your tripod, and get ready to tell your travel story, one breathtaking self-portrait at a time. The world is waiting for your lens!
What are your favorite solo travel photography hacks? Share your tips and triumphs in the comments below!
Visual journey

Tags
Share this adventure
Join the travel community
New adventures, cultural insights and travel inspiration, straight to your inbox.
We may receive a commission if you click on a link and buy a product, service or policy, at no extra cost to you. How affiliate links work.
Been there?